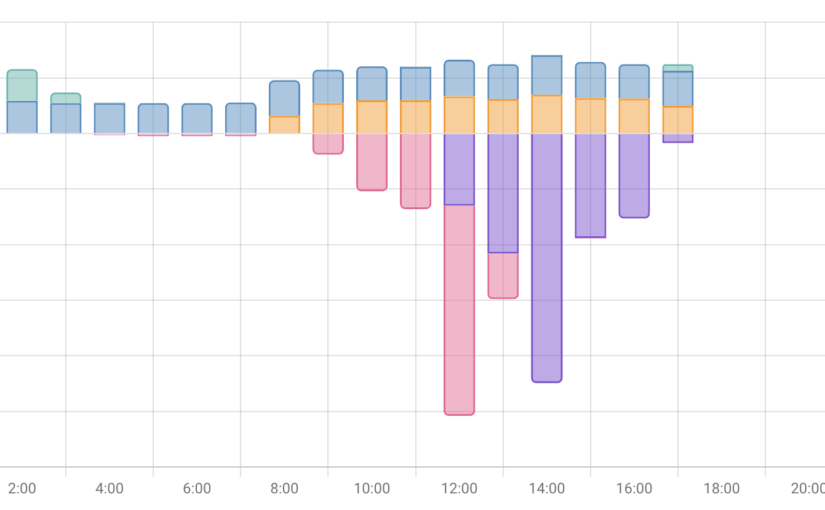
Let there be … battery and power

After getting the Home Assistant-based control system up and running, the next steps for my smart RV were the quick wins—in other words, figuring out what works “right out of the box.” Since the Raspberry Pi has a Bluetooth interface, I configured it in Home Assistant. And just like that, I could “see” the batteries (both of which come with built-in BMS) as well as the Victron solar charge controller. The corresponding sensors were then immediately available after I installed the appropriate apps.

An informative dashboard was then quickly built on that foundation.

In subsequent steps, you can set up automations that, for example, notify you when the charge drops below a certain threshold. I implemented the shore power display using my air conditioning control system; more on that later.

Motorhome Control Online

I recently gave a general overview of my“smart RV”project. Today, I want to outline the first step: how can I securely connect the control system to the internet so that I can check the status (temperatures, gas levels, battery charge levels, etc.) while on the road and control various functions, such as the air conditioning or heating?

My RV is equipped with an Oyster Easynet router. The 12V power supply runs to it through cable channels, and I used these to install a 12V-to-5V USB converter to power my Raspberry Pi 4. The Raspberry Pi runs a standard Home Assistant image that I installed on the SD card using Raspberry Pi Imager. There, you can easily set up the Wi-Fi address and other settings so that the Pi is visible on the vehicle’s own network immediately after booting. The Oyster router assigns an address via DHCP, which conveniently remains stable—there isn’t much you can customize with the Easynet components.

To ensure that the Home Assistant instance is available online, you need to do the following. I have registered my own domain with my hosting provider (Domainfactory). Since I want to use Cloudflare, I need to set up the appropriate DNS servers there.

The next step is to create a free account on Cloudflare and add the domain you registered earlier. The penultimate step is to install and configure the Cloudflare app in Home Assistant. There, you must enter the domain that was also registered with Cloudflare. When you launch the app and everything has been done correctly, a callback link will appear in the log, which is used to establish the tunnel connection between the domain and Home Assistant.

Copy this, paste it into the browser's address bar, and you're done. If everything went well, you'll see that the connection is established when you restart the app.

To make sure everything is secure, I've set up IP blocking in the configuration.yaml file and also enabled 2FA for my login. No one can get in without a code from the Authenticator app.

http:
  cors_allowed_origins:
    - https://google.com
    - https://www.home-assistant.io
  ip_ban_enabled: true
  login_attempts_threshold: 3
  use_x_forwarded_for: true
  trusted_proxies:
    - 172.30.33.0/24

Then all that's left is to create a nice icon on my phone's home screen that takes me straight to my HomeAssiant in the RV. We're on the road. We're online.

Smart RV: Technology for Modern Travel

First off: there’s plenty to be said for why a motorhome should be—or become—“smart.” If you’re reading this, you’re most likely interested in the topic. Possible reasons include: keeping track of energy usage and being able to take action early on, controlling devices like the heating or air conditioning while on the road (so it’s warm or cool when you get back), or simply having a strong interest in technology.

For me, it’s a mix of all of these things, though the last point might be the most important one: my RV is equipped with outdated technology, and that just… doesn’t work. Sure, I could have paid more attention to that, but it’s also true that the whole “smart RV” concept is evolving rapidly.

Here's what the home screen of my mobile Home Assistant looks like now:

Home Assistant is accessible via the internet through Cloudflare and can therefore be controlled using a laptop, smartphone, etc. I’ve integrated quite a few things using various methods and can monitor everything related to power supply and gas consumption, as well as control the air conditioning. I have a few more projects planned, such as connecting the heating system, monitoring water tank levels, further optimizing the visualization, and implementing a few automation features.

My starting points were the blogs by Hannes Schleeh, who has consistently covered this topic on his site. When it comes to Home Assistant topics, I always enjoy checking in with Simon. And last but not least, I use Claude.ai quite extensively for various projects (whether for design, ESP32 or add-on programming, automation, or visualization).

I’ll be writing a post on each of the topics mentioned over time, and I look forward to hearing your thoughts.

Roof-mounted solar array: 64% (instead of 75%) self-sufficiency

It all started in 2022—my solar power system was finally designed by SENEC and then installed by a local provider. The entire project went “live” in 2025; the battery had to be replaced, but everything is finally up and running. Time to take stock.

The paper calculation had shown a self-sufficiency rate of 75%, but the actual figures for last year came out to 64%:

Screenshot

Just a quick note about the setup: our house was built in 2019, features state-of-the-art insulation, and is equipped with a geothermal heat pump. No oil, no gas. Underfloor heating is a great option for this setup—and we have it installed.

I think 64% is okay, but it always breaks my heart to see how much surplus the plant produces and how little we get in return. There are certainly ideas out there (green hydrogen, pumped-storage power plants, compressed air storage, river batteries, etc.). Just take a look for yourself at how this is being done in California, for example, or what’s planned for the future. That shows me: it’s possible. If you want it. And if you think these issues through to the end.

In the meantime, I’m pleased that we’re moving toward 100% self-sufficiency starting in April, that everything is in order, and that the system’s depreciation is progressing as I’d hoped month by month. My next steps are now focused on optimizing the heating system, which I want to integrate more closely with the solar PV system. In theory, that should work…

Screenshot

When will the sun finally shine again?

Since my storage unit was replaced with the SENEC P4, there have been no more "good" sunny days, so I couldn't really judge how the new storage unit would perform. On December 27, the time had finally come - there was enough sun to fully charge the 4 installed cells.

Over the course of the day, 16.9 kWh went into the storage system and gradually came out again over 6 hours from around 3 pm. Of course, this reduces the costs enormously, but there was still no real grid feed-in and it should of course look much better when the sun is in the sky for longer.

I've also started using Home Assistant to find out what the biggest consumers are. It's no surprise that the geothermal heat pump draws a lot, especially in winter. My network cabinet is also doing "very well". The dryer, washing machine, coffee machine, etc. are also always doing well. I work here with Shelly Plug S plugs for power consumption measurement and the HACS AddOn PowerCalc. How all this works, including measuring the consumption of the heat pump, will be explained in subsequent articles.

Public Listening: a train journey that is ... informative.

Today I'm once again traveling a longer distance by train, several hours towards the capital. I'm always amazed at how open some people are about conversations, phone calls and their laptops. Having recently read the book "The Abolition of Death", which explains the concept of public listening, I paid particular attention to it this time. A public listener is someone who simply listens in order to gather sensitive information. In the book, this was done deliberately, but for me it happens accidentally (and involuntarily). I usually actively listen away or use headphones with noise cancellation, but today I was curious.

What can you collect in one go?

  • What are your fellow travelers working on? Are they shopping (what, where, how much)? Are they just watching a movie? Or are they working on a report (the logo on the report makes it easy to see where they are working) that you can easily read?
  • How do you get into the laptop? Fingerprints are difficult, but very bad passwords are still often used. Ditto the simple access codes on cell phones (1234) or the Z or L if you can use the line guidance.
  • While this still requires a certain amount of personal effort, phone calls and conversations are "for everyone". Sometimes I can't believe how openly people talk about highly sensitive projects, customers, etc. here (I'll leave the disclosure of privacy out of the equation).

My conclusion: when I travel in public, I always use a privacy screen, both for my cell phone and my laptop. I generally don't make phone calls at all and if I do, I let the other person know that I can't talk freely and that we should leave it until later or use a chat application. If it's a business trip, talking business with colleagues is simply taboo for me. It's all really simple, but few people take it seriously.

When it comes to noise-canceling, I use Bose Quitcomfort Overear products (which provide a certain amount of isolation due to their design) or Apple AirPods.

Mission SENEC.Home P4 in the Home Assistant: completed.

Using the SENEC Web API and converting kW to kWh with helpers that convert the power curve using Integral worked. After about a full day, I was able to compare the curves in the Energy Dashboard and the SENEC iOS app. As both use the same database and the curves are identical, everything seems to have worked. I'm quite happy with that. Next, I'll see how I can get my geothermal heat pump into the dashboard as a consumer.

Oh yes, I often only find the best tips when everything is done. Is it the algorithm? Who really knows. In any case, here is one of the best tutorials on the energy dashboard that covers all the relevant aspects:

Energy dashboard problems with SENEC.Home P4

The Home P4 is installed and seems to be running. As I said, I'm waiting for the sun to come out so that I can see how many kWh are going into the storage system. And then go out again when necessary. Everything is displayed perfectly in the SENEC iOS app, but the Home Assistant energy dashboard no longer works. This is because the P4 is not (yet) supported and therefore the generic Web API must be used.

Said and done. But nothing is displayed or the corresponding sensors cannot be selected in the dashboard configuration. After a bit of research, I found out that the reason is that the Web API only displays the values in kW. However, the dashboard would like to have these aggregated in kWh. So I did some more research and lo and behold: you "simply" (if you know how) create a helper instance for each value - a total integral sensor, right? This then collects the kW values for an hour and they become kWh. I left the metric prefix empty. At the beginning I had "k" (kilo) in there, but that resulted in kkWh. So too small by a factor of 1000. The time unit is hours, the input sensor is selected from the Web API and bang, you can integrate the new sensor. But it's not quite as quick as that, there has to be a certain history first. And then something happens again in the dashboard. Over the next few days, I will find out whether this is the case by comparing it with the iOS app and the values from the Web API. Another step forward.

TheMagic5: Swimming goggles for every head

I've been swimming since I was 9 years old, sometimes in a club, many years on triathlon courses, now as a hobby, but still with distances of 2000m and more. Swimming goggles are indispensable and my beloved Michael Phelps model is obviously no longer available. As I've often heard about TheMagic5 through advertising, I decided to take action.

TheMagic5 emerged from a Kickstarter project and moved from Denmark to Charlotte, North Carolina. The founders have the appropriate sporting and entrepreneurial background, which I find very appealing. The promise is to create personalized swimming goggles. I tried that out.

First you choose a model and order it. The question "and what should be personalized about it?" is easy to answer. After the purchase, you download an app to your cell phone, with which the personalization can be assigned by order number. The app first measures your face and then, in a second step, standardizes the size (you take a photo with a credit card-sized card on your forehead). And that's all there is to it.

Shipping took 5 days - including a weekend in between. Very good! The glasses come in a high-quality case that protects them from crushing the rubber seals and scratching the lenses. There are also nose pieces included that allow you to adjust the distance minimally, depending on how narrow or wide you like it.

I adjusted the straps to fit my head and they felt great. Today I swam 2400m in them and what can I say? Although the goggles only fit loosely, they are absolutely tight and fit perfectly. No feeling of pressure at all after a total of 1 hour in the water without taking the goggles off. The vision is also brilliant. It remains to be seen whether this will remain stable over time and whether the rather high price is justified.

My switch to the SENEC.Home P4 hybrid: initial findings

In February, my Home 4 storage system was installed, which was throttled down to 70% by SENEC. At the beginning of November, the time had come - my storage system was replaced. Before I go into this, I'd like to share some experience with the "old" storage system, which I had ordered with 12.6 kWh. If I convert this to 70%, that makes approx. 8.8 kWh. My house consumption in summer was 0.5 kW, which, in my (perhaps too amateurish) opinion, should have been enough for many hours to easily get me through the night. But that never worked out, after 6 hours it was always the end of the day and the grid had to kick in again. If I do the math, I end up with just 3 kWh, let's say a generous 4 kWh. That's roughly 32%.

This is of course a joke and I ask myself: who has also had this experience? And: who knows how SENEC will compensate for the lost capacity? I will definitely look into this further and contact my general contractor, but also SENEC itself.

Now to the Home P4 hybrid. I didn't believe that it would be replaced in the near future, but it was D-Day at the beginning of November and the memory was replaced. Not the battery modules and the control unit, no, the entire device. It looks exactly the same on the outside as it does on the inside. The necessary updates were carried out via the Internet connection (unlike the Home 4, where several USB sticks had to be sent to the installer), the replacement was completed within 2 hours and everything looked the same as before, except ...

  • only 5 instead of 6 battery modules fit into the storage unit
  • Home Assistant integration has not worked since then(1)

I've only had 1 really sunny day since then, so I can't judge whether the battery charges to 100% (so far the maximum value has been around 80% . after all) and how far I get with it in phases without sun. It would be so easy if it were easier ... but it isn't. I will report again.

(1) In my opinion, this is because the new storage systems are only read out indirectly via the Web API via the SENEC portal and the units of measurement do not match the energy dashboard (e.g. kWh are not returned for the PV electricity generated, but kW - the dashboard does not like this. However, it is possible to convert this.